# React Navigation 1.x Documentation
## Getting started
Source: https://reactnavigation.org/docs/1.x/getting-started
React Navigation is born from the React Native community's need for an extensible yet easy-to-use navigation solution written entirely in JavaScript (so you can read and understand all of the source), on top of powerful native primitives.
Before you commit to using React Navigation for your project, you might want to read the [anti-pitch](pitch.md) — it will help you to understand the tradeoffs that we have chosen along with the areas where we consider the library to be deficient currently.
## What to expect
If you're already familiar with React Native then you'll be able to get moving with React Navigation quickly! If not, you may want to read sections 1 to 4 (inclusive) of [React Native Express](http://reactnativeexpress.com/) first, then come back here when you're done.
What follows within the _Fundamentals_ section of this documentation is a tour of the most important aspects of React Navigation. It should be enough for you know how to build your typical small mobile application, and give you the background that you need to dive deeper into the more advanced parts of React Navigation.
## Installation
Install the `react-navigation` package in your React Native project.
```bash npm2yarn
npm install react-navigation
```
You're good to go! Continue to ["Hello React Navigation"](hello-react-navigation.md) to start writing some code.
---
## Hello React Navigation
Source: https://reactnavigation.org/docs/1.x/hello-react-navigation
In a web browser, you can link to different pages using an anchor (``) tag. When the user clicks on a link, the URL is pushed to the browser history stack. When the user presses the back button, the browser pops the item from the top of the history stack, so the active page is now the previously visited page. React Native doesn't have a built-in idea of a global history stack like a web browser does -- this is where React Navigation enters the story.
React Navigation's `StackNavigator` provides a way for your app to transition between screens and manage navigation history. If your app uses only one `StackNavigator` then it is conceptually similar to how a web browser handles navigation state - your app pushes and pops items from the navigation stack as users interact with it, and this results in the user seeing different screens. A key difference between how this works in a web browser and in React Navigation is that React Navigation's `StackNavigator` provides the gestures and animations that you would expect on Android and iOS when navigating between routes in the stack.
All we need to get started using React Navigation is a `StackNavigator`.
## Creating a StackNavigator
`StackNavigator` is a function that returns a React component. It takes _a route configuration object_ and, optionally, _an options object_ (we omit this below, for now). Because the `StackNavigator` function returns a React component, we can export it directly from `App.js` to be used as our App's root component.
```javascript
// In App.js in a new project
import React from 'react';
import { View, Text } from 'react-native';
import { StackNavigator } from 'react-navigation';
class HomeScreen extends React.Component {
render() {
return (
Home Screen
);
}
}
export default StackNavigator({
Home: {
screen: HomeScreen,
},
});
```
→ Run this code
If you run this code, you will see a screen with an empty navigation bar and a grey content area containing your `HomeScreen` component. The styles you see for the navigation bar and the content area are the default configuration for a `StackNavigator`, we'll learn how to configure those later.
> The casing of the route name doesn't matter -- you can use lowercase `home` or capitalized `Home`, it's up to you. We prefer capitalizing our route names.
> The only required configuration for a route is the `screen` component. You can read more about the other options available in the [StackNavigator reference](stack-navigator.md).
In React Native, the component exported from `App.js` is the entry point (or root component) for your app -- it is the component from which every other component descends. It's often useful to have more control over the component at the root of your app than you would get from exporting a `StackNavigator`, so let's export a component that just renders our `StackNavigator`.
```js
const RootStack = StackNavigator({
Home: {
screen: HomeScreen,
},
});
export default class App extends React.Component {
render() {
return
Details Screen
);
}
}
const RootStack = StackNavigator(
{
Home: {
screen: HomeScreen,
},
Details: {
screen: DetailsScreen,
},
},
{
initialRouteName: 'Home',
}
);
// Other code for App component here...
```
Now our stack has two _routes_, a `Home` route and a `Details` route. The `Home` route corresponds to the `HomeScreen` component, and the `Details` route corresponds to the `DetailsScreen` component. The initial route for the stack is the `Home` route. The natural question at this point is: "how do I move from the Home route to the Details route?". That is covered in the next section.
## Summary
- React Native doesn't have a built-in API for navigation like a web browser does. React Navigation provides this for you, along with the iOS and Android gestures and animations to transition between screens.
- `StackNavigator` is a function that takes a route configuration object and an options object and returns a React component.
- The keys in the route configuration object are the route names and the values are the configuration for that route. The only required property on the configuration is the `screen` (the component to use for the route).
- To specify what the initial route in a stack is, provide an `initialRouteName` on the stack options object.
- [Full source of what we have built so far](https://snack.expo.io/@react-navigation/hello-react-navigation).
---
## Supported React Native versions
Source: https://reactnavigation.org/docs/1.x/supported-react-native-versions
Currently at the time of writing, `react-navigation@1.x` will work on most of previous `react-native` versions.
> Please note that the statement above may not be correct for a particular `react-native` version. If you notice a version that is not working properly, feel free to either file an [issue](https://github.com/react-navigation/react-navigation.github.io/issues/new) or correct it in this page.
---
## Moving between screens
Source: https://reactnavigation.org/docs/1.x/navigating
In the previous section, ["Hello React Navigation"](hello-react-navigation.md), we defined a `StackNavigator` with two routes (`Home` and `Details`), but we didn't learn how to let a user navigate from `Home` to `Details` (although we did learn how to change the _initial_ route in our code, but forcing our users to clone our repository and change the route in our code in order to see another screen is arguably among the worst user experiences one could imagine).
If this was a web browser, we'd be able to write something like this:
```
Go to Details
```
Another way to write this would be:
```
{ document.location.href = "details.html"; }}>Go to Details
```
We'll do something similar to the latter, but rather than using a `document` global we'll use the `navigation` prop that is passed down to our screen components.
## Navigating to a new screen
```js
import React from 'react';
import { Button, View, Text } from 'react-native';
import { StackNavigator } from 'react-navigation';
class HomeScreen extends React.Component {
render() {
return (
Home Screen
this.props.navigation.navigate('Details')}
/>
);
}
}
// ... other code from the previous section
```
→ Run this code
Let's break down this down:
- `this.props.navigation`: the `navigation` prop is passed in to every **screen component** ([definition](glossary-of-terms.md#screen-component)) in `StackNavigator` (more about this later in ["The navigation prop in depth"](navigation-prop.md)).
- `navigate('Details')`: we call the `navigate` function (on the `navigation` prop — naming is hard!) with the name of the route that we'd like to move the user to.
> If we call `this.props.navigation.navigate` with a route name that we haven't defined on a `StackNavigator`, nothing will happen. Said another way, we can only navigate to routes that have been defined on our `StackNavigator` — we cannot navigate to an arbitrary component.
So we now have a stack with two routes: 1) the Home route 2) the Details route. What would happen if we navigated to the Details route again, from the Details screen?
## Navigate to a route multiple times
```js
class DetailsScreen extends React.Component {
render() {
return (
Details Screen
this.props.navigation.navigate('Details')}
/>
);
}
}
```
→ Run this code
If you run this code, you'll notice that each time you press the "Go to Details... again" button it will push a new screen on top. This is where our original comparison to `document.location.href` falls apart, because in a web browser these would not be treated as distinct routes and no new entries would be added to the browser history — `navigate` for `StackNavigator` behaves more like the web's `window.history.pushState`: each time you call `navigate` it pushes a new route to the navigation stack.
## Going back
The header provided by `StackNavigator` will automatically include a back button when it is possible to go back from the active screen (if there is only one screen in the navigation stack, there is nothing that you can go back to, and so there is no back button).
Sometimes you'll want to be able to programmatically trigger this behavior, and for that you can use `this.props.navigation.goBack();`.
```js
class DetailsScreen extends React.Component {
render() {
return (
Details Screen
this.props.navigation.navigate('Details')}
/>
this.props.navigation.goBack()}
/>
);
}
}
```
→ Run this code
> On Android, React Navigation hooks in to the hardware back button and fires the `goBack()` function for you when the user presses it, so it behaves as the user would expect.
Another common requirement is to be able to go back _multiple_ screens -- for example, if you are several screens deep in a stack and want to dismiss all of them to go back to the first screen. We'll discuss how to do this in ["Building a sign in flow"](auth-flow.md).
## Summary
- `this.props.navigation.navigate('RouteName')` pushes a new route to the `StackNavigator`. We can call it as many times as we like and it will continue pushing routes.
- The header bar will automatically show a back button, but you can programmatically go back by calling `this.props.navigation.goBack()`. On Android, the hardware back button just works as expected.
- The `navigation` prop is available to all screen components (components defined as screens in route configuration and rendered by React Navigation as a route).
- [Full source of what we have built so far](https://snack.expo.io/@react-navigation/going-back).
---
## Passing parameters to routes
Source: https://reactnavigation.org/docs/1.x/params
Now that we know how to [create a StackNavigator with some routes](hello-react-navigation.md) and [navigate between those routes](navigating.md), let's look at how we can pass data to routes when we navigate to them.
There are two pieces to this:
1. Pass params to a route by putting them in an object as a second parameter to the `navigation.navigate` function: `this.props.navigation.navigate('RouteName', { /* params go here */ })`
2. Read the params in your screen component: `this.props.navigation.state.params`. Alternatively, if you want to access the params directly (eg. through `this.props.itemId`), you may use a community-developed [react-navigation-props-mapper](https://github.com/vonovak/react-navigation-props-mapper) package.
```js
class HomeScreen extends React.Component {
render() {
return (
Home Screen
{
/* 1. Navigate to the Details route with params */
this.props.navigation.navigate('Details', {
itemId: 86,
otherParam: 'anything you want here',
});
}}
/>
);
}
}
class DetailsScreen extends React.Component {
render() {
/* 2. Read the params from the navigation state */
const { params } = this.props.navigation.state;
const itemId = params ? params.itemId : null;
const otherParam = params ? params.otherParam : null;
return (
Details Screen
itemId: {JSON.stringify(itemId)}
otherParam: {JSON.stringify(otherParam)}
this.props.navigation.navigate('Details')}
/>
this.props.navigation.goBack()}
/>
);
}
}
```
→ Run this code
## Summary
- `navigate` accepts an optional second argument to let you pass parameters to the route you are navigating to. For example: `this.props.navigation.navigate('RouteName', {paramName: 'value'})` pushes a new route to the `StackNavigator`, where the params are `{paramName: 'value'}`.
- You can read the params from `this.props.navigation.state.params`. It is `null` if no parameters are specified.
- [Full source of what we have built so far](https://snack.expo.io/@react-navigation/navigate-with-params).
---
## Configuring the header bar
Source: https://reactnavigation.org/docs/1.x/headers
By now you're probably tired of seeing a blank grey bar on the top of your screen — you're ready for some [flair](https://memegenerator.net/img/images/600x600/14303485/stan-flair-office-space.jpg). So let's jump in to configuring the header bar.
## Setting the header title
A screen component can have a static property called `navigationOptions` which is either an object or a function that returns an object that contains various configuration options. The one we use for the header title is `title`, as demonstrated in the following example.
```js
class HomeScreen extends React.Component {
static navigationOptions = {
title: 'Home',
};
/* render function, etc */
}
class DetailsScreen extends React.Component {
static navigationOptions = {
title: 'Details',
};
/* render function, etc */
}
```
→ Run this code
> `StackNavigator` uses platform conventions by default, so on iOS the title will be centered and on Android it will be left-aligned.
## Using params in the title
In order to use params in the title, we need to make `navigationOptions` a function that returns a configuration object. It might be tempting to try to use `this.props` inside of `navigationOptions`, but because it is a static property of the component, `this` does not refer to an instance of the component and therefore no props are available. Instead, if we make `navigationOptions` a function then React Navigation will call it with an object containing `{ navigation, navigationOptions, screenProps }` -- in this case, all we care about is `navigation`, which is the same object that is passed to your screen props as `this.props.navigation`. You may recall that we can get the params from `navigation` through `navigation.state.params`, and so we do this below to extract a param and use it as a title.
```js
class DetailsScreen extends React.Component {
static navigationOptions = ({ navigation }) => {
const { params } = navigation.state;
return {
title: params ? params.otherParam : 'A Nested Details Screen',
};
};
/* render function, etc */
}
```
→ Run this code
The argument that is passed in to the `navigationOptions` function is an object with the following properties:
- `navigation` - The [navigation prop](navigation-prop.md) for the screen, with the screen's route at `navigation.state`.
- `screenProps` - The props passing from above the navigator component
- `navigationOptions` - The default or previous options that would be used if new values are not provided
We only needed the `navigation` prop in the above example but you may in some cases want to use `screenProps` or `navigationOptions`.
## Updating `navigationOptions` with `setParams`
It's often necessary to update the `navigationOptions` configuration for the active screen from the mounted screen component itself. We can do this using `this.props.navigation.setParams`
```js
/* Inside of render() */
this.props.navigation.setParams({ otherParam: 'Updated!' })}
/>
```
→ Run this code
## Adjusting header styles
There are three key properties to use when customizing the style of your header: `headerStyle`, `headerTintColor`, and `headerTitleStyle`.
- `headerStyle`: a style object that will be applied to the `View` that wraps the header. If you set `backgroundColor` on it, that will be the color of your header.
- `headerTintColor`: the back button and title both use this property as their color. In the example below, we set the tint color to white (`#fff`) so the back button and the header title would be white.
- `headerTitleStyle`: if we want to customize the `fontFamily`, `fontWeight` and other `Text` style properties for the title, we can use this to do it.
```js
class HomeScreen extends React.Component {
static navigationOptions = {
title: 'Home',
headerStyle: {
backgroundColor: '#f4511e',
},
headerTintColor: '#fff',
headerTitleStyle: {
fontWeight: 'bold',
},
};
/* render function, etc */
}
```
→ Run this code
There are a couple of things to notice here:
1. On iOS the status bar text and icons are black, and this doesn't look great over a dark colored background. We won't discuss it here, but you should be sure to configure the status bar to fit with your screen colors [as described in the status bar guide](status-bar.md).
2. The configuration we set only applies to the home screen; when we navigate to the details screen, the default styles are back. We'll look at how to share `navigationOptions` between screens now.
## Sharing common `navigationOptions` across screens
It is common to want to configure the header in a similar way across many screens. For example, your company brand color might be red and so you want the header background color to be red and tint color to be white. Conveniently, these are the colors we're using our running example, and you'll notice that when you navigate to the `DetailsScreen` the colors go back to the defaults. Wouldn't it be awful if we had to copy the `navigationOptions` header style properties from `HomeScreen` to `DetailsScreen`, and for every single screen component we use in our app? Thankfully, we do not. We can instead move the configuration up to the `StackNavigator`.
```js
class HomeScreen extends React.Component {
static navigationOptions = {
title: 'Home',
/* No more header config here! */
};
/* render function, etc */
}
/* other code... */
const RootStack = StackNavigator(
{
Home: {
screen: HomeScreen,
},
Details: {
screen: DetailsScreen,
},
},
{
initialRouteName: 'Home',
/* The header config from HomeScreen is now here */
navigationOptions: {
headerStyle: {
backgroundColor: '#f4511e',
},
headerTintColor: '#fff',
headerTitleStyle: {
fontWeight: 'bold',
},
},
}
);
```
→ Run this code
Now, any screen that belongs to the `RootStack` will have our wonderful branded styles. Surely though, there must be a way to override these options if we need to?
## Overriding shared `navigationOptions`
The `navigationOptions` specified on your screen component are merged together with those of its parent `StackNavigator`, with the options on the screen component taking precedence. Let's use this knowledge to invert the background and tint colors on the details screen.
```js
class DetailsScreen extends React.Component {
static navigationOptions = ({ navigation, navigationOptions }) => {
const { params } = navigation.state;
return {
title: params ? params.otherParam : 'A Nested Details Screen',
/* These values are used instead of the shared configuration! */
headerStyle: {
backgroundColor: navigationOptions.headerTintColor,
},
headerTintColor: navigationOptions.headerStyle.backgroundColor,
};
};
/* render function, etc */
}
```
→ Run this code
## Replacing the title with a custom component
Sometimes you need more control than just changing the text and styles of your title -- for example, you may want to render an image in place of the title, or make the title into a button. In these cases you can completely override the component used for the title and provide your own.
```js
class LogoTitle extends React.Component {
render() {
return (
→ Run this code
> You might be wondering, why `headerTitle` when we provide a component and not `title`, like before? The reason is that `headerTitle` is a property that is specific to a `StackNavigator`, the `headerTitle` defaults to a `Text` component that displays the `title`.
## Additional configuration
You can read the full list of available screen `navigationOptions` for screens inside of `StackNavigator` in the [StackNavigator reference](stack-navigator.md#navigationoptions-used-by-stacknavigator).
## Summary
- You can customize the header inside of the `navigationOptions` static property on your screen components. Read the full list of options [in the API reference](stack-navigator.md#navigationoptions-used-by-stacknavigator).
- The `navigationOptions` static property can be an object or a function. When it is a function, it is provided with an object with the `navigation` prop, `screenProps`, and `navigationOptions` on it.
- You can also specify shared `navigationOptions` in the `StackNavigator` configuration when you initialize it. The static property takes precedence over that configuration.
- [Full source of what we have built so far](https://snack.expo.io/@react-navigation/custom-header-title-component).
---
## Header buttons
Source: https://reactnavigation.org/docs/1.x/header-buttons
Now that we know how to customize the look of our headers, let's make them sentient! Actually perhaps that's ambitious, let's just make them able to respond to our touches in very well defined ways.
## Adding a button to the header
The most common way to interact with a header is by tapping on a button either to the left or the right of the title. Let's add a button to the right side of the header (one of the most difficult places to touch on your entire screen, depending on finger and phone size, but also a normal place to put buttons).
```js
class HomeScreen extends React.Component {
static navigationOptions = {
headerTitle: alert('This is a button!')}
title="Info"
color="#fff"
/>
),
};
}
```
→ Run this code
The binding of `this` in `navigationOptions` is _not_ the `HomeScreen` instance, so you can't call `setState` or any instance methods on it. This is pretty important because it's extremely common to want the buttons in your header to interact with the screen that the header belongs to. So, we will look how to do this next.
There is a community-developed package for rendering buttons in the header with the correct styling available [react-navigation-header-buttons](https://github.com/vonovak/react-navigation-header-buttons).
## Header interaction with its screen component
The most commonly used pattern for giving a header button access to a function on the component instance is to use `params`. We'll demonstrate this with a classic example, the counter.
```js
class HomeScreen extends React.Component {
static navigationOptions = ({ navigation }) => {
const params = navigation.state.params || {};
return {
headerTitle: → Run this code
> React Navigation doesn't guarantee that your screen component will begin mounting before the header for the screen is rendered, and because the `increaseCount` param is set in `componentWillMount`, we may not have it available to us in `navigationOptions`, which is why we include the `|| {}` when grabbing the params (there may not be any). We know this is an awkward API and we do plan on improving it!
> As an alternative to `setParams`, you could use a state management library (such as Redux or MobX) and communicate between the header and the screen in the same way you would with two distinct components.
## Customizing the back button
`StackNavigator` provides the platform-specific defaults for the back button. On iOS this includes a label next to the button, which shows the title of the previous screen when the title fits in the available space, otherwise it says "Back".
You can change the label behavior with `headerBackTitle` and `headerTruncatedBackTitle` ([read more](stack-navigator.md#headerbacktitle)).
To customize the back button image, you can use [headerBackImage](stack-navigator.md#headerbackimage).
## Overriding the back button
The back button will be rendered automatically in a `StackNavigator` whenever it is possible for the user to go back from their current screen — in other words, the back button will be rendered whenever there is more than one screen in the stack.
Generally, this is what you want. But it's possible that in some circumstances that you want to customize the back button more than you can through the options mentioned above, in which case you can specify a `headerLeft`, just as we did with `headerRight`, and completely override the back button.
## Summary
- You can set buttons in the header through the `headerLeft` and `headerRight` properties in `navigationOptions`.
- The back button is fully customizable with `headerLeft`, but if you just want to change the title or image, there are other `navigationOptions` for that — `headerBackTitle`, `headerTruncatedBackTitle`, and `headerBackImage`.
- [Full source of what we have built so far](https://snack.expo.io/@react-navigation/header-interacting-with-component-instance).
---
## Opening a full-screen modal
Source: https://reactnavigation.org/docs/1.x/modal
Dictionary.com provides no satisfactory definition of modal as it relates to user interfaces, but semantic UI describes it as follows:
> A modal displays content that temporarily blocks interactions with the main view
This sounds about right. A modal is like a popup — it's not part of your primary navigation flow — it usually has a different transition, a different way to dismiss it, and is intended to focus on one particular piece of content or interaction.
The purpose of explaining this as part of the React Navigation fundamentals is not only because this is a common use case, but also because the implementation requires knowledge of _nesting navigators_, which is an important part of React Navigation.
## Creating a modal stack
```js
class HomeScreen extends React.Component {
static navigationOptions = ({ navigation }) => {
const params = navigation.state.params || {};
return {
headerLeft: (
navigation.navigate('MyModal')}
title="Info"
color="#fff"
/>
),
/* the rest of this config is unchanged */
};
};
/* render function, etc */
}
class ModalScreen extends React.Component {
render() {
return (
This is a modal!
this.props.navigation.goBack()}
title="Dismiss"
/>
);
}
}
const MainStack = StackNavigator(
{
Home: {
screen: HomeScreen,
},
Details: {
screen: DetailsScreen,
},
},
{
/* Same configuration as before */
}
);
const RootStack = StackNavigator(
{
Main: {
screen: MainStack,
},
MyModal: {
screen: ModalScreen,
},
},
{
mode: 'modal',
headerMode: 'none',
}
);
```
→ Run this code
There are some important things to notice here:
- As we know, the `StackNavigator` function returns a React component (remember we render `
Home Screen
this.props.navigation.navigate('Details')}
/>
);
}
}
```
→ Run this code
The ["Navigation prop reference"](navigation-prop.md) section goes into more detail on this, describes workarounds, and provides more information on other properties available on `this.props.navigation`.
---
## Tab navigation
Source: https://reactnavigation.org/docs/1.x/tab-based-navigation
Possibly the most common style of navigation in mobile apps is tab-based navigation. This can be tabs on the bottom of the screen or on the top, below the header (or in place of the header).
## Minimal example of tab-based navigation
```js
import React from 'react';
import { Text, View } from 'react-native';
import { TabNavigator } from 'react-navigation';
class HomeScreen extends React.Component {
render() {
return (
Home!
);
}
}
class SettingsScreen extends React.Component {
render() {
return (
Settings!
);
}
}
export default TabNavigator({
Home: { screen: HomeScreen },
Settings: { screen: SettingsScreen },
});
```
→ Run this code
## Customizing the appearance
This is similar to how you would customize a `StackNavigator` — there are some properties that are set when you initialize the `TabNavigator` and others that can be customized per-screen in `navigationOptions`.
```js
// You can import Ionicons from @expo/vector-icons if you use Expo or
// react-native-vector-icons/Ionicons otherwise.
import Ionicons from 'react-native-vector-icons/Ionicons';
import { TabNavigator, TabBarBottom } from 'react-navigation';
export default TabNavigator(
{
Home: { screen: HomeScreen },
Settings: { screen: SettingsScreen },
},
{
navigationOptions: ({ navigation }) => ({
tabBarIcon: ({ focused, tintColor }) => {
const { routeName } = navigation.state;
let iconName;
if (routeName === 'Home') {
iconName = `ios-information-circle${focused ? '' : '-outline'}`;
} else if (routeName === 'Settings') {
iconName = `ios-options${focused ? '' : '-outline'}`;
}
// You can return any component that you like here! We usually use an
// icon component from react-native-vector-icons
return → Run this code
Let's dissect this:
- `tabBarIcon` is a property on `navigationOptions`, so we know we can use it on our screen components, but in this case chose to put it in the `TabNavigator` configuration in order to centralize the icon configuration for convenience.
- `tabBarIcon` is a function that is given the `focused` state and `tintColor`. If you take a peek further down in the configuration you will see `tabBarOptions` and `activeTintColor` and `inactiveTintColor`. These default to the iOS platform defaults, but you can change them here. The `tintColor` that is passed through to the `tabBarIcon` is either the active or inactive one, depending on the `focused` state (focused is active).
- In order to make the behavior the same on iOS and Android, we have explicitly provided `tabBarComponent`, `tabBarPosition`, `animationEnabled`, and `swipeEnabled`. The default behavior of `TabNavigator` is to show a tab bar on the top of the screen on Android and on the bottom on iOS, but here we force it to be on the bottom on both platforms.
- Read the [full API reference](tab-navigator.md) for further information on `TabNavigator` configuration options.
## Jumping between tabs
Switching from one tab to another has a familiar API — `this.props.navigation.navigate`.
```js
import { Button, Text, View } from 'react-native';
class HomeScreen extends React.Component {
render() {
return (
Home!
this.props.navigation.navigate('Settings')}
/>
);
}
}
class SettingsScreen extends React.Component {
render() {
return (
Settings!
this.props.navigation.navigate('Home')}
/>
);
}
}
```
→ Run this code
## A `StackNavigator` for each tab
Usually tabs don't just display one screen — for example, on your Twitter feed, you can tap on a tweet and it brings you to a new screen within that tab with all of the replies. You can think of this as there being separate navigation stacks within each tab, and that's exactly how we will model it in React Navigation.
```js
import { TabNavigator, StackNavigator } from 'react-navigation';
class DetailsScreen extends React.Component {
render() {
return (
Details!
);
}
}
class HomeScreen extends React.Component {
render() {
return (
{/* other code from before here */}
this.props.navigation.navigate('Details')}
/>
);
}
}
class SettingsScreen extends React.Component {
render() {
return (
{/* other code from before here */}
this.props.navigation.navigate('Details')}
/>
);
}
}
const HomeStack = StackNavigator({
Home: { screen: HomeScreen },
Details: { screen: DetailsScreen },
});
const SettingsStack = StackNavigator({
Settings: { screen: SettingsScreen },
Details: { screen: DetailsScreen },
});
export default TabNavigator(
{
Home: { screen: HomeStack },
Settings: { screen: SettingsStack },
},
{
/* Other configuration remains unchanged */
}
);
```
→ Run this code
## Why do we need a TabNavigator instead of TabBarIOS or some other component?
It's common to attempt to use a standalone tab bar component without integrating it into the navigation library you use in your app. In some cases, this works fine! You should be warned, however, that you may run into some frustrating unanticipated issues when doing this.
For example, React Navigation's `TabNavigator` takes care of handling the Android back button for you, while standalone components typically do not. Additionally, it is more difficult for you (as the developer) to perform actions such as "jump to this tab and then go to this screen" if you need to call into two distinct APIs for it. Lastly, mobile user interfaces have numerous small design details that require that certain components are aware of the layout or presence of other components — for example, if you have a translucent tab bar, content should scroll underneath it and the scroll view should have an inset on the bottom equal to the height of the tab bar so you can see all of the content. Double tapping the tab bar should make the active navigation stack pop to the top of the stack, and doing it again should scroll the active scroll view in that stack scroll to the top. While not all of these behaviors are implemented out of the box yet with React Navigation, they will be and you will not get any of this if you use a standalone tab view component.
## A tab icon that doesn't navigate
If you want a tab icon that never actually opens a stack navigator, simple provide the `tabBarOnPress` callback for the tab's `navigationOptions` without invoking the provided `jumpToIndex` method.
```js
new TabNavigator({
...,
Placeholder: {
screen: () => null,
navigationOptions: {
tabBarOnPress: () => {
// do something custom here
},
},
}
...
});
```
---
## Drawer navigation
Source: https://reactnavigation.org/docs/1.x/drawer-based-navigation
```js
class HomeScreen extends React.Component {
render() {
return (
this.props.navigation.navigate('DrawerOpen')}
>
Open Drawer
Home
);
}
}
class SettingsScreen extends React.Component {
render() {
return (
this.props.navigation.navigate('DrawerOpen')}
>
Open Drawer
Settings
);
}
}
const MyDrawerNavigator = new DrawerNavigator(
{
Home: HomeScreen,
Settings: SettingsScreen,
},
{
drawerBackgroundColor: 'rgba(255,255,255,.9)',
contentOptions: {
activeTintColor: '#fff',
activeBackgroundColor: '#6b52ae',
},
}
);
export default MyDrawerNavigator;
```
→ Run this code
To open and close drawer, navigate to `'DrawerOpen'` and `'DrawerClose'` respectively.
```js
this.props.navigation.navigate('DrawerOpen'); // open drawer
this.props.navigation.navigate('DrawerClose'); // close drawer
```
If you would like to toggle the drawer you can navigate to `'DrawerToggle'`, and this will choose which navigation is appropriate for you given the drawers current state.
```js
// fires 'DrawerOpen'/'DrawerClose' accordingly
this.props.navigation.navigate('DrawerToggle');
```
---
## Authentication flows
Source: https://reactnavigation.org/docs/1.x/auth-flow
Most apps require that a user authenticate in some way to have access to data associated with a user or other private content. Typically the flow will look like this:
- The user opens the app.
- The app loads some authentication state from persistent storage (for example, `AsyncStorage`).
- When the state has loaded, the user is presented with either authentication screens or the main app, depending on whether valid authentication state was loaded.
- When the user signs out, we clear the authentication state and send them back to authentication screens.
> Note: we say "authentication screens" because usually there is more than one. You may have a main screen with a username and password field, another for "forgot password", and another set for sign up.
## Set up our navigators
```js
import { StackNavigator, SwitchNavigator } from 'react-navigation';
// Implementation of HomeScreen, OtherScreen, SignInScreen, AuthLoadingScreen
// goes here.
const AppStack = StackNavigator({ Home: HomeScreen, Other: OtherScreen });
const AuthStack = StackNavigator({ SignIn: SignInScreen });
export default SwitchNavigator(
{
AuthLoading: AuthLoadingScreen,
App: AppStack,
Auth: AuthStack,
},
{
initialRouteName: 'AuthLoading',
}
);
```
→ Run this code
You may not be familiar with `SwitchNavigator` yet. The purpose of `SwitchNavigator` is to only ever show one screen at a time. By default, it does not handle back actions and it resets routes to their default state when you switch away. This is the exact behavior that we want from the authentication flow: when users sign in, we want to throw away the state of the authentication flow and unmount all of the screens, and when we press the hardware back button we expect to not be able to go back to the authentication flow. We switch between routes in the `SwitchNavigator` by using the `navigate` action. You can read more about the `SwitchNavigator` in the [API reference](switch-navigator.md).
We set the `initialRouteName` to `'AuthLoading'` because we will fetch our authentication state from persistent storage inside of that screen component.
## Implement our authentication loading screen
```js
import React from 'react';
import {
ActivityIndicator,
AsyncStorage,
StatusBar,
StyleSheet,
View,
} from 'react-native';
class AuthLoadingScreen extends React.Component {
constructor(props) {
super(props);
this._bootstrapAsync();
}
// Fetch the token from storage then navigate to our appropriate place
_bootstrapAsync = async () => {
const userToken = await AsyncStorage.getItem('userToken');
// This will switch to the App screen or Auth screen and this loading
// screen will be unmounted and thrown away.
this.props.navigation.navigate(userToken ? 'App' : 'Auth');
};
// Render any loading content that you like here
render() {
return (
);
}
}
```
→ Run this code
## Fill in other components
Our `App` and `Auth` routes are both `StackNavigators`, but you could do whatever you like here. As mentioned above, you probably want your authentication route to be a stack for password reset, signup, etc. Similarly for your app, you probably have more than one screen. We won't talk about how to implement the text inputs and buttons for the authentication screen, that is outside of the scope of navigation. We'll just fill in some placeholder content.
```js
class SignInScreen extends React.Component {
static navigationOptions = {
title: 'Please sign in',
};
render() {
return (
);
}
_signInAsync = async () => {
await AsyncStorage.setItem('userToken', 'abc');
this.props.navigation.navigate('App');
};
}
class HomeScreen extends React.Component {
static navigationOptions = {
title: 'Welcome to the app!',
};
render() {
return (
);
}
_showMoreApp = () => {
this.props.navigation.navigate('Other');
};
_signOutAsync = async () => {
await AsyncStorage.clear();
this.props.navigation.navigate('Auth');
};
}
// More code like OtherScreen omitted for brevity
```
→ Run this code
That's about all there is to it. At the moment, `SwitchNavigator` doesn't support animating between screens. Let us know if this is important to you [on Canny](https://react-navigation.canny.io/feature-requests).
---
## iPhone X support
Source: https://reactnavigation.org/docs/1.x/handling-iphonex
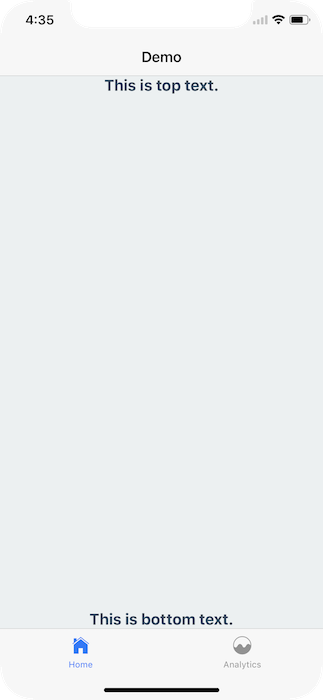
By default React Navigation aids in ensuring your application displays correctly on the iPhoneX. It does so by using `SafeAreaView` inside of UI elements that may interact with the sensor cluster ("the notch") or the home activity indicator.
## Hidden/Custom Navigation Bar or Tab Bar
However, if you're overriding the default navigation bar it's important to ensure your UI doesn't interfere with either of those hardware elements.
For example, if I render nothing for the `header` or `tabBarComponent` nothing renders
```javascript
const Tabs = TabNavigator({
...
}, {
tabBarComponent: () => null,
});
export default StackNavigator({
...
}, {
headerMode: 'none',
});
```
To fix this issue you can wrap your content in a `SafeAreaView`, which can be imported from either `react-native` or `react-navigation`.
```javascript
import { SafeAreaView } from 'react-navigation';
class App extends Component {
render() {
return (
This is top text.
This is bottom text.
);
}
}
```

This will detect if the app is running on an iPhoneX and, if so, ensure the content isn't hidden behind any hardware elements.
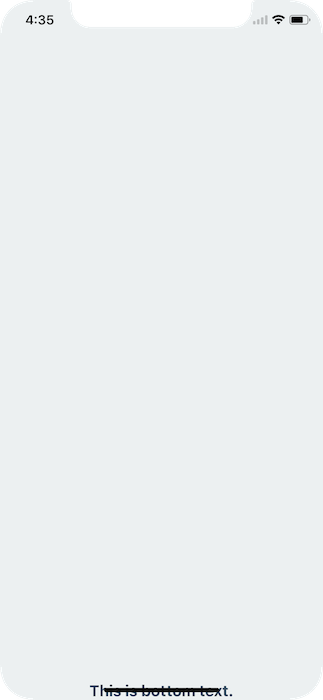
## Landscape Mode
Even if you're using the default navigation bar and tab bar if your application works in landscape mode it's important to ensure you content isn't hidden behind the sensor cluster.
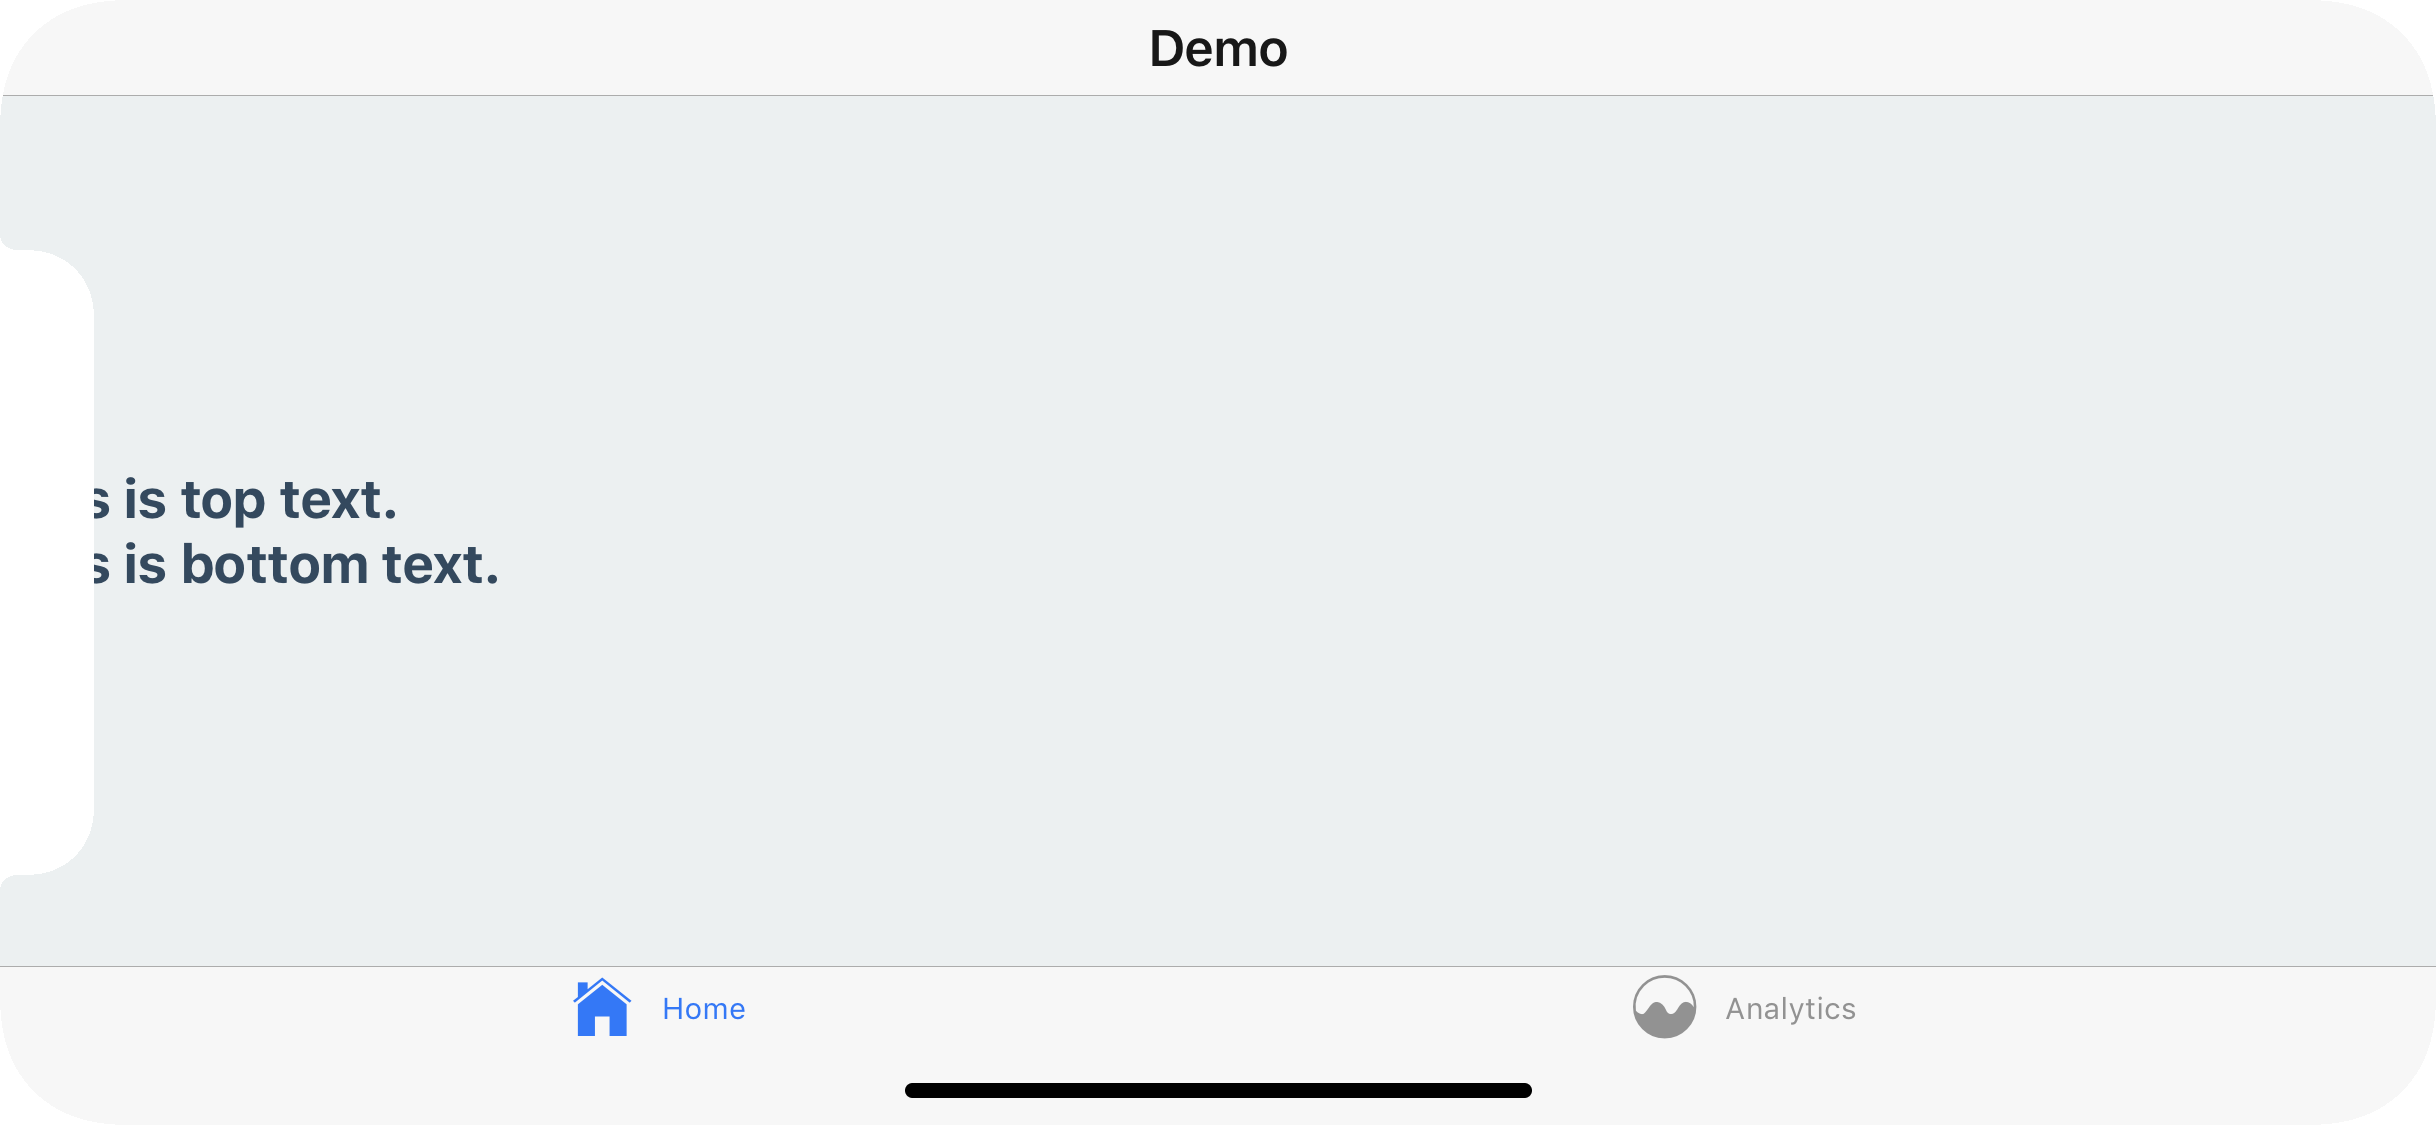
To fix this you can, once again, wrap your content in a `SafeAreaView`. This will not conflict with the navigation bar or tab bar's default behavior in portrait mode.

In conclusion, use the `SafeAreaView` component on the screens you register with a React Navigation navigator.
A [Snack](https://snack.expo.io/BJ6-M8pEG) is available with the code used in this overview.
---
## Different status bar configuration based on route
Source: https://reactnavigation.org/docs/1.x/status-bar
If you don't have a navigation header, or your navigation header changes color based on the route, you'll want to ensure that the correct color is used for the content.
## StackNavigator and DrawerNavigator
This is a simple task when using the StackNavigator or DrawerNavigator. You can simply render the `StatusBar` component, which is exposed by React Native, and set your config.
```javascript
class Screen1 extends React.Component {
render() {
return (
Light Screen
this.props.navigation.navigate('Screen2')}
color={isAndroid ? 'blue' : '#fff'}
/>
);
}
}
class Screen2 extends React.Component {
render() {
return (
Dark Screen
this.props.navigation.navigate('Screen1')}
/>
);
}
}
```
```javascript
export default StackNavigator(
{
Screen1: {
screen: Screen1,
},
Screen2: {
screen: Screen2,
},
},
{
headerMode: 'none',
}
);
```
```javascript
export default DrawerNavigator({
Screen1: {
screen: Screen1,
},
Screen2: {
screen: Screen2,
},
});
```
## TabNavigator
If you're using a TabNavigator it's a bit more complex because the screens on all of your tabs are rendered at once - that means that the last `StatusBar` config you set will be used (likely on the final tab of your tab navigator, not what the user is seeing).
To fix this we'll have to do two things
1. Only use the `StatusBar` component on our initial screen. This allows us to ensure the correct `StatusBar` config is used.
2. Leverage the events system in React Navigation and `StatusBar`'s implicit API to change the `StatusBar` configuration when a tab becomes active.
First, the new `Screen2.js` will no longer use the `StatusBar` component.
```javascript
class Screen2 extends React.Component {
render() {
return (
Dark Screen
this.props.navigation.navigate('Screen1')}
/>
{/* this.props.navigation.navigate('DrawerToggle')}
/> */}
);
}
}
```
Then, in both `Screen1.js` and `Screen2.js` we'll set up a listener to change the `StatusBar` configuration when that tab `didFocus`. We'll also make sure to remove the listener when the `TabNavigator` has been unmounted.
```javascript
class Screen1 extends React.Component {
componentDidMount() {
this._navListener = this.props.navigation.addListener('didFocus', () => {
StatusBar.setBarStyle('light-content');
isAndroid && StatusBar.setBackgroundColor('#6a51ae');
});
}
componentWillUnmount() {
this._navListener.remove();
}
...
}
class Screen2 extends React.Component {
componentDidMount() {
this._navListener = this.props.navigation.addListener('didFocus', () => {
StatusBar.setBarStyle('dark-content');
isAndroid && StatusBar.setBackgroundColor('#ecf0f1');
});
}
componentWillUnmount() {
this._navListener.remove();
}
...
}
```
The code used for these demos is available as a [Snack](https://snack.expo.io/r1iuFP6Ez).
---
## Custom Android back button behavior
Source: https://reactnavigation.org/docs/1.x/custom-android-back-button-handling
By default, when user presses the Android hardware back button, react-navigation will pop a screen or exit the app if there are no screens to pop. This is a sensible default behavior, but there are situations when you might want to implement custom handling.
Take, for example, a screen where user is selecting items in a list, and a "selection mode" is active. On a back button press, you would first want the "selection mode" to be deactivated, and the screen should be popped only on the second back button press. The following code snippet demonstrates the situation. We make use of [`BackHandler`](https://reactnative.dev/docs/backhandler.html) which comes with react-native to add our custom `hardwareBackPress` listener.
Returning `true` from `onBackButtonPressAndroid` denotes that we have handled the event, and react-navigation's lister will not get called, thus not popping the screen. Returning `false` will cause the event to bubble up and react-navigation's listener will pop the screen.
```js
class ScreenWithCustomBackBehavior extends React.Component {
componentDidMount() {
BackHandler.addEventListener(
'hardwareBackPress',
this.onBackButtonPressAndroid
);
}
componentWillUnmount() {
BackHandler.removeEventListener(
'hardwareBackPress',
this.onBackButtonPressAndroid
);
}
onBackButtonPressAndroid = () => {
if (this.isSelectionModeEnabled()) {
this.disableSelectionMode();
return true;
} else {
return false;
}
};
}
```
The presented approach will work well for screens that are shown in a `StackNavigator`. Custom back button handling in other situations may not be supported at the moment (eg. A known case when this does not work is when you want to handle back button press in an open drawer. PRs for such use cases are welcome!)
---
## Access the navigation prop from any component
Source: https://reactnavigation.org/docs/1.x/connecting-navigation-prop
[`withNavigation`](with-navigation.md) is a higher order component which passes the `navigation` prop into a wrapped Component. It's useful when you cannot pass the `navigation` prop into the component directly, or don't want to pass it in case of a deeply nested child.
```javascript
import React from 'react';
import { Button } from 'react-native';
export default class MyBackButton extends React.Component {
render() {
// This will throw an 'undefined is not a function' exception because the navigation
// prop is undefined.
return (
{
this.props.navigation.goBack();
}}
/>
);
}
}
```
To resolve this exception, you could pass the `navigation` prop in to `MyBackButton` when you render it from a screen, like so: ` {
this.props.navigation.goBack();
}}
/>
);
}
}
// withNavigation returns a component that wraps MyBackButton and passes in the
// navigation prop
export default withNavigation(MyBackButton);
```
Using this approach, you can render `MyBackButton` anywhere in your app without passing in a `navigation` prop explicitly and it will work as expected.
---
## Navigating without the navigation prop
Source: https://reactnavigation.org/docs/1.x/navigating-without-navigation-prop
Calling functions such as `navigate` or `popToTop` on the `navigation` prop is not the only way to navigate around your app. As an alternative, you can dispatch navigation actions on your top-level navigator, provided you aren't passing your own `navigation` prop as you would with a redux integration. The presented approach is useful in situations when you want to trigger a navigation action from places where you do not have access to the `navigation` prop, or if you're looking for an alternative to using the `navigation` prop.
You can get access to a navigator through a `ref` and pass it to the `NavigationService` which we will later use to navigate. Use this only with the top-level (root) navigator of your app.
```javascript
// App.js
import NavigationService from './NavigationService';
const TopLevelNavigator = StackNavigator({ /* ... */ })
class App extends React.Component {
// ...
render(): {
return (
{
NavigationService.setTopLevelNavigator(navigatorRef);
}}
/>
);
}
}
```
In the next step, we define `NavigationService` which is a simple module with functions that dispatch user-defined navigation actions.
```javascript
// NavigationService.js
import { NavigationActions } from 'react-navigation';
let _navigator;
function setTopLevelNavigator(navigatorRef) {
_navigator = navigatorRef;
}
function navigate(routeName, params) {
_navigator.dispatch(
NavigationActions.navigate({
type: NavigationActions.NAVIGATE,
routeName,
params,
})
);
}
// add other navigation functions that you need and export them
export default {
navigate,
setTopLevelNavigator,
};
```
Then, in any of your javascript modules, just import the `NavigationService` and call functions which you exported from it. You may use this approach outside of your React components and, in fact, it works just as well when used from within them.
```javascript
// any js module
import NavigationService from 'path-to-NavigationService.js';
// ...
NavigationService.navigate('ChatScreen', { userName: 'Lucy' });
```
In `NavigationService`, you can create your own navigation actions, or compose multiple navigation actions into one, and then easily reuse them throughout your application. When writing tests, you may mock the navigation functions, and make assertions on whether the correct functions are called, with the correct parameters.
---
## Deep linking
Source: https://reactnavigation.org/docs/1.x/deep-linking
In this guide we will set up our app to handle external URIs. Let's suppose that we want a URI like `example://chat/Eric` to open our app and link straight into a chat screen for some user named "Eric".
## Configuration
Previously, we had defined a navigator like this:
```js
const SimpleApp = StackNavigator({
Home: { screen: HomeScreen },
Chat: { screen: ChatScreen },
});
```
We want paths like `chat/Eric` to link to a "Chat" screen with the `user` passed as a param. Let's re-configure our chat screen with a `path` that tells the router what relative path to match against, and what params to extract. This path spec would be `chat/:user`.
```js
const SimpleApp = StackNavigator({
Home: { screen: HomeScreen },
Chat: {
screen: ChatScreen,
path: 'chat/:user',
},
});
```
## Set up with Expo projects
You need to specify a scheme for your app. You can register for a scheme in your `app.json` by adding a string under the scheme key:
```json
{
"expo": {
"scheme": "example"
}
}
```
### URI Prefix
Next, let's configure our navigation container to extract the path from the app's incoming URI.
```js
const SimpleApp = StackNavigator({...});
const prefix = Expo.Linking.makeUrl('/');
const MainApp = () =>
// Add this above the `@end`:
- (BOOL)application:(UIApplication *)application openURL:(NSURL *)url
sourceApplication:(NSString *)sourceApplication annotation:(id)annotation
{
return [RCTLinkingManager application:application openURL:url
sourceApplication:sourceApplication annotation:annotation];
}
```
In Xcode, open the project at `SimpleApp/ios/SimpleApp.xcodeproj`. Select the project in sidebar and navigate to the info tab. Scroll down to "URL Types" and add one. In the new URL type, set the identifier and the URL scheme to your desired URL scheme.

Now you can press play in Xcode, or re-build on the command line:
```bash
react-native run-ios
```
To test the URI on the simulator, run the following:
```
xcrun simctl openurl booted example://chat/Eric
```
To test the URI on a real device, open Safari and type `example://chat/Eric`.
### Android
To configure the external linking in Android, you can create a new intent in the manifest.
In `SimpleApp/android/app/src/main/AndroidManifest.xml`, do these followings adjustments:
1. Set `launchMode` of `MainActivity` to `singleTask` in order to receive intent on existing `MainActivity`. It is useful if you want to perform navigation using deep link you have been registered - [details](http://developer.android.com/training/app-indexing/deep-linking.html#adding-filters)
2. Add the new `intent-filter` inside the `MainActivity` entry with a `VIEW` type action:
```
```
Now, re-install the app:
```bash
react-native run-android
```
To test the intent handling in Android, run the following:
```
adb shell am start -W -a android.intent.action.VIEW -d "example://chat/Eric" com.simpleapp
```
## Disable deep linking
Unfortunately, version 1.x does not support to disable deep-linking handling. If you wish to handle deep-linking yourself instead of `react-navigation`, please upgrade to newer versions.
---
## Screen tracking
Source: https://reactnavigation.org/docs/1.x/screen-tracking
This example shows how to do screen tracking and send to Google Analytics. The approach can be adapted to any other analytics SDK.
When using built-in navigation container, we can use `onNavigationStateChange` to track the screen.
```js
import { GoogleAnalyticsTracker } from 'react-native-google-analytics-bridge';
const tracker = new GoogleAnalyticsTracker(GA_TRACKING_ID);
// gets the current screen from navigation state
function getCurrentRouteName(navigationState) {
if (!navigationState) {
return null;
}
const route = navigationState.routes[navigationState.index];
// dive into nested navigators
if (route.routes) {
return getCurrentRouteName(route);
}
return route.routeName;
}
const AppNavigator = StackNavigator(AppRouteConfigs);
export default () => (
{
const currentScreen = getCurrentRouteName(currentState);
const prevScreen = getCurrentRouteName(prevState);
if (prevScreen !== currentScreen) {
// the line below uses the Google Analytics tracker
// change the tracker here to use other Mobile analytics SDK.
tracker.trackScreenView(currentScreen);
}
}}
/>
);
```
### Screen tracking with Redux
When using Redux, we can write a Redux middleware to track the screen. For this purpose,
we will reuse `getCurrentRouteName` from the previous section.
```js
import { NavigationActions } from 'react-navigation';
import { GoogleAnalyticsTracker } from 'react-native-google-analytics-bridge';
const tracker = new GoogleAnalyticsTracker(GA_TRACKING_ID);
const screenTracking =
({ getState }) =>
(next) =>
(action) => {
if (
action.type !== NavigationActions.NAVIGATE &&
action.type !== NavigationActions.BACK
) {
return next(action);
}
const currentScreen = getCurrentRouteName(getState().navigation);
const result = next(action);
const nextScreen = getCurrentRouteName(getState().navigation);
if (nextScreen !== currentScreen) {
// the line below uses the Google Analytics tracker
// change the tracker here to use other Mobile analytics SDK.
tracker.trackScreenView(nextScreen);
}
return result;
};
export default screenTracking;
```
### Create Redux store and apply the above middleware
The `screenTracking` middleware can be applied to the store during its creation. See [Redux Integration](redux-integration.md) for details.
```js
const store = createStore(
combineReducers({
navigation: navigationReducer,
...
}),
applyMiddleware(
screenTracking,
...
),
);
```
---
## Redux integration
Source: https://reactnavigation.org/docs/1.x/redux-integration
Some folks like to have their navigation state stored in the same place as the rest of their application state. Using Redux to store your state enables you to write custom actions that manipulate the navigation state directly, to be able to dispatch navigation actions from anywhere (sometimes in a "thunk" or "saga") and to persist the navigation state in the same way you would other Redux state (your mileage may vary on this). You can read more about other use cases in the replies to [this tweet](https://twitter.com/satya164/status/952291726521024512).
## Warning
_You probably do not need to do this!_ Storing your React Navigation state in your own Redux store is likely to give you a very difficult time if you don't know what you're doing. You lose out on some performance optimizations that React Navigation can do for you, for example. Please do not integrate your state into Redux without first ensuring that you can do what you need to do without it!
## Overview
1. To handle your app's navigation state in Redux, you can pass your own `navigation` prop to a navigator.
2. Once you pass your own navigation prop to the navigator, the default [`navigation`](navigation-prop.md) prop gets destroyed. You must construct your own `navigation` prop with [`state`](navigation-prop.md#state---the-screens-current-stateroute), [`dispatch`](navigation-prop.md#dispatch---send-an-action-to-the-router), and `addListener` properties.
3. The `state` will be fed from the reducer assigned to handle navigation state and the `dispatch` will be Redux's default `dispatch`. Thus you will be able to dispatch normal redux actions using `this.props.navigation.dispatch(ACTION)`, reducer will update the navigation state on the basis of dispatched action, the new navigation state will then be passed to the navigator.
4. A middleware is needed so that any events that mutate the navigation state properly trigger the event listeners.
## Step-by-step guide
First, you need to add the `react-navigation-redux-helpers` package to your project.
```bash npm2yarn
npm install react-navigation-redux-helpers
```
With Redux, your app's state is defined by a reducer. Each navigation router effectively has a reducer, called `getStateForAction`. The following is a minimal example of how you might use navigators within a Redux application:
```es6
import {
StackNavigator,
addNavigationHelpers,
} from 'react-navigation';
import {
createStore,
applyMiddleware,
combineReducers,
} from 'redux';
import {
createReduxBoundAddListener,
createReactNavigationReduxMiddleware,
} from 'react-navigation-redux-helpers';
import { Provider, connect } from 'react-redux';
import React from 'react';
const AppNavigator = StackNavigator(AppRouteConfigs);
const initialState = AppNavigator.router.getStateForAction(AppNavigator.router.getActionForPathAndParams('Login'));
const navReducer = (state = initialState, action) => {
const nextState = AppNavigator.router.getStateForAction(action, state);
// Simply return the original `state` if `nextState` is null or undefined.
return nextState || state;
};
const appReducer = combineReducers({
nav: navReducer,
...
});
// Note: createReactNavigationReduxMiddleware must be run before createReduxBoundAddListener
const middleware = createReactNavigationReduxMiddleware(
"root",
state => state.nav,
);
const addListener = createReduxBoundAddListener("root");
class App extends React.Component {
render() {
return (
);
}
}
```
Once you do this, your navigation state is stored within your Redux store, at which point you can fire navigation actions using your Redux dispatch function.
Keep in mind that when a navigator is given a `navigation` prop, it relinquishes control of its internal state. That means you are now responsible for persisting its state, handling any deep linking, [Handling the Hardware Back Button in Android](#handling-the-hardware-back-button-in-android), etc.
Navigation state is automatically passed down from one navigator to another when you nest them. Note that in order for a child navigator to receive the state from a parent navigator, it should be defined as a `screen`.
Applying this to the example above, you could instead define `AppNavigator` to contain a nested `TabNavigator` as follows:
```es6
const AppNavigator = StackNavigator({
Home: { screen: MyTabNavigator },
});
```
In this case, once you `connect` `AppNavigator` to Redux as is done in `AppWithNavigationState`, `MyTabNavigator` will automatically have access to navigation state as a `navigation` prop.
## Full example
There's a working example app with Redux [here](https://github.com/react-navigation/react-navigation/tree/1.x/examples/ReduxExample) if you want to try it out yourself.
## Mocking tests
To make jest tests work with your react-navigation app, you need to change the jest preset in the `package.json`, see [here](https://facebook.github.io/jest/docs/tutorial-react-native.html#transformignorepatterns-customization):
```json
"jest": {
"preset": "react-native",
"transformIgnorePatterns": [
"node_modules/(?!(jest-)?react-native|react-navigation)"
]
}
```
## Handling the Hardware Back Button in Android
By using the following snippet, your nav component will be aware of the back button press actions and will correctly interact with your stack. This is really useful on Android.
```es6
import React from 'react';
import { BackHandler } from 'react-native';
import { addNavigationHelpers, NavigationActions } from 'react-navigation';
const AppNavigation = TabNavigator({
Home: { screen: HomeScreen },
Settings: { screen: SettingScreen },
});
class ReduxNavigation extends React.Component {
componentDidMount() {
BackHandler.addEventListener('hardwareBackPress', this.onBackPress);
}
componentWillUnmount() {
BackHandler.removeEventListener('hardwareBackPress', this.onBackPress);
}
onBackPress = () => {
const { dispatch, nav } = this.props;
if (nav.index === 0) {
return false;
}
dispatch(NavigationActions.back());
return true;
};
render() {
const { dispatch, nav } = this.props;
const navigation = addNavigationHelpers({
dispatch,
state: nav,
addListener,
});
return {
this.navigator = nav;
}}
/>
);
}
}
```
Please notice that this solution should only be used on the top level navigator.
## Navigation Containers
The built in navigators can automatically behave like top-level navigators when the navigation prop is missing. This functionality provides a transparent navigation container, which is where the top-level navigation prop comes from.
When rendering one of the included navigators, the navigation prop is optional. When it is missing, the container steps in and manages its own navigation state. It also handles URLs, external linking, and Android back button integration.
For the purpose of convenience, the built-in navigators have this ability because behind the scenes they use `createNavigationContainer`. Usually, navigators require a navigation prop in order to function.
Top-level navigators accept the following props:
### `onNavigationStateChange(prevState, newState, action)`
Function that gets called every time navigation state managed by the navigator changes. It receives the previous state, the new state of the navigation and the action that issued state change. By default it prints state changes to the console.
### `uriPrefix`
The prefix of the URIs that the app might handle. This will be used when handling a [deep link](deep-linking.md) to extract the path passed to the router.
---
## Routers
Source: https://reactnavigation.org/docs/1.x/routers
Routers define a component's navigation state, and they allow the developer to define paths and actions that can be handled.
## Built-In Routers
`react-navigation` ships with a few standard routers:
- [StackRouter](https://github.com/react-navigation/react-navigation/blob/1.x/src/routers/StackRouter.js)
- [TabRouter](https://github.com/react-navigation/react-navigation/blob/1.x/src/routers/TabRouter.js)
## Using Routers
To make a navigator manually, put a static `router` on a component.
```js
class MyNavigator extends React.Component {
static router = StackRouter(routes, config);
...
}
```
Now you can use this component as a `screen` in another navigator, and the navigation logic for `MyNavigator` will be defined by this `StackRouter`.
## Customizing Routers
See the [Custom Router API spec](custom-routers.md) to learn about the API of `StackRouter` and `TabRouter`. You can override the router functions as you see fit:
### Custom Navigation Actions
To override navigation behavior, you can override the navigation state logic in `getStateForAction`, and manually manipulate the `routes` and `index`.
```js
const MyApp = StackNavigator(
{
Home: { screen: HomeScreen },
Profile: { screen: ProfileScreen },
},
{
initialRouteName: 'Home',
}
);
const defaultGetStateForAction = MyApp.router.getStateForAction;
MyApp.router.getStateForAction = (action, state) => {
if (state && action.type === 'PushTwoProfiles') {
const routes = [
...state.routes,
{ key: 'A', routeName: 'Profile', params: { name: action.name1 } },
{ key: 'B', routeName: 'Profile', params: { name: action.name2 } },
];
return {
...state,
routes,
index: routes.length - 1,
};
}
return defaultGetStateForAction(action, state);
};
```
### Blocking Navigation Actions
Sometimes you may want to prevent some navigation activity, depending on your route.
```js
import { NavigationActions } from 'react-navigation';
const MyStackRouter = StackRouter(
{
Home: { screen: HomeScreen },
Profile: { screen: ProfileScreen },
},
{
initialRouteName: 'Home',
}
);
const defaultGetStateForAction = MyStackRouter.router.getStateForAction;
MyStackRouter.router.getStateForAction = (action, state) => {
if (
state &&
action.type === NavigationActions.BACK &&
state.routes[state.index].params.isEditing
) {
// Returning null from getStateForAction means that the action
// has been handled/blocked, but there is not a new state
return null;
}
return defaultGetStateForAction(action, state);
};
```
### Handling Custom URIs
Perhaps your app has a unique URI which the built-in routers cannot handle. You can always extend the router `getActionForPathAndParams`.
```js
import { NavigationActions } from 'react-navigation';
const MyApp = StackNavigator(
{
Home: { screen: HomeScreen },
Profile: { screen: ProfileScreen },
},
{
initialRouteName: 'Home',
}
);
const previousGetActionForPathAndParams =
MyApp.router.getActionForPathAndParams;
Object.assign(MyApp.router, {
getActionForPathAndParams(path, params) {
if (path === 'my/custom/path' && params.magic === 'yes') {
// returns a profile navigate action for /my/custom/path?magic=yes
return NavigationActions.navigate({
routeName: 'Profile',
action: NavigationActions.navigate({
// This child action will get passed to the child router
// ProfileScreen.router.getStateForAction to get the child
// navigation state.
routeName: 'Friends',
}),
});
}
return previousGetActionForPathAndParams(path, params);
},
});
```
---
## Custom navigators
Source: https://reactnavigation.org/docs/1.x/custom-navigators
A navigator is any React component that has a [router](https://github.com/react-navigation/react-navigation/blob/1.x/src/routers/StackRouter.js) on it. Here is a basic one, which uses the [router's API](routers.md) to get the active component to render:
```js
class MyNavigator extends React.Component {
static router = MyRouter;
render() {
const { state, dispatch, addListener } = this.props.navigation;
const { routes, index } = state;
// Figure out what to render based on the navigation state and the router:
const Component = MyRouter.getComponentForState(state);
// The state of the active child screen can be found at routes[index]
let childNavigation = { dispatch, addListener, state: routes[index] };
// If we want, we can also tinker with the dispatch function here, to limit
// or augment our children's actions
// addListener is needed to support children Stack and Drawer navigators
// Assuming our children want the convenience of calling .navigate() and so on,
// we should call addNavigationHelpers to augment our navigation prop:
childNavigation = addNavigationHelpers(childNavigation);
return ,
};
```
For more information about the `NavigationRoute` type, check out its [flow definition](https://github.com/react-navigation/react-navigation/blob/1.x/flow/react-navigation.js).
### `render` function
Invoked from `Transitioner.render()`. This function performs the actual rendering delegated from `Transitioner`. In this function, we can use the information included in the `transitionProps` and `prevTransitionProps` parameters to render scenes, create animations and handle gestures.
There are a few important properties of the `transitionProps` and `prevTransitionProps` parameters that are useful for the tasks mentioned above:
- `scenes: Array` - a list of all available scenes
- `position: NavigationAnimatedValue` - the progressive index of the transitioner's navigation state
- `progress: NavigationAnimatedValue` - the value that represents the progress of the transition when navigation state changes from one to another. Its numeric value will range from 0 to 1.
For the complete list of properties of `NavigationTransitionProps`, check out its [flow definition](https://github.com/react-navigation/react-navigation/blob/1.x/flow/react-navigation.js).
#### Examples
`transitionProps.scenes` is the list of all available scenes. It is up to the implementor to determine how to lay them out on the screen. For example, we can render the scenes as a stack of cards like so:
```jsx
_render(transitionProps, prevTransitionProps) {
const scenes = transitionProps.scenes.map(scene => this._renderScene(transitionProps, scene));
return (
{scenes}
);
}
```
We can then use an `Animated.View` to animate the transition. To create necessary animated style properties, such as `opacity`, we can interpolate on `position` and `progress` values that come with `transitionProps`:
```jsx
_renderScene(transitionProps, scene) {
const { position } = transitionProps;
const { index } = scene;
const opacity = position.interpolate({
inputRange: [index-1, index, index+1],
outputRange: [0, 1, 0],
});
// The prop `router` is populated when we call `createNavigator`.
const Scene = this.props.router.getComponent(scene.route.routeName);
return (
{ Scene }
)
}
```
The above code creates a cross fade animation during transition.
For a comprehensive tutorial on how to create custom transitions, see this [blog post](http://www.reactnativediary.com/2016/12/20/navigation-experimental-custom-transition-1.html).
#### Flow definition
```js
render: (transitionProps: NavigationTransitionProps, prevTransitionProps: ?NavigationTransitionProps) => React.Node,
```
#### Parameters
- `transitionProps`: the current [NavigationTransitionProps](https://github.com/react-navigation/react-navigation/blob/1.x/flow/react-navigation.js) created from the current state and props
- `prevTransitionProps`: the previous [NavigationTransitionProps](https://github.com/react-navigation/react-navigation/blob/1.x/flow/react-navigation.js) created from the previous state and props
#### Returns
- A ReactElement, which will be used to render the Transitioner component
### `onTransitionStart` function
Invoked when the transition animation is about to start.
If you return a promise from `onTransitionStart`, the transition animation will begin after the promise is resolved.
#### Flow definition
```js
onTransitionStart: (transitionProps: NavigationTransitionProps, prevTransitionProps: ?NavigationTransitionProps) => (Promise | void),
```
#### Parameters
- `transitionProps`: the current [NavigationTransitionProps](https://github.com/react-navigation/react-navigation/blob/1.x/flow/react-navigation.js) created from the current state and props
- `prevTransitionProps`: the previous [NavigationTransitionProps](https://github.com/react-navigation/react-navigation/blob/1.x/flow/react-navigation.js) created from the previous state and props
#### Returns
- `Promise` to delay the start of the transition animation, or none to begin the transition animation immediately.
### `onTransitionEnd` function
Invoked once the transition animation completes.
If you return a promise from `onTransitionEnd`, any queued transition animations will begin after the promise is resolved.
#### Flow definition
```js
onTransitionEnd: () => void
```
#### Parameters
- none.
#### Returns
- none.
---
## Pitch & anti-pitch
Source: https://reactnavigation.org/docs/1.x/pitch
It's useful when considering whether or not to use a project to understand the tradeoffs that the developers of the project made when building it. What problems does it explicitly try to solve for you, and which ones does it ignore? What are the current limitations of the project and common problems that people encounter? These are the kinds of questions that we believe you should have answers to when making an important technology decision for your project, and so we have documented answers to these questions as best we can here, in the form of a "pitch" (why you should use it) and "anti-pitch" (why you should not use it). Please [submit a pull request](https://github.com/react-navigation/website) if you believe we have omitted important information!
## Pitch
- Everything is written in JavaScript on top of React Native primitives — for example, animations use the `Animated` API and its native driver option in order to run the animations on the main thread and produce smooth 60 fps transitions. Writing everything except the low-level primitives like animations and gestures in JavaScript has a lot of benefits:
- Easy OTA updates
- Debuggable
- Customizable
- Most apps heavily customize navigation, to do this with an API that wraps native navigation you will need to write a lot of native code.
- It's easy to write your own navigators that integrate cleanly with standard navigators, or to fork the standard navigators and create your own version of them with the exact look and feel you want in your app.
## Anti-pitch
- The API is sometimes unintuitive and difficult to use, improvements may require breaking changes. We are working to make ["easy things easy and hard things possible"](https://www.quora.com/What-is-the-origin-of-the-phrase-make-the-easy-things-easy-and-the-hard-things-possible) and this may require us to change the API at times.
- React Navigation does not directly use the native navigation APIs on iOS and Android; rather, it re-creates some subset of those APIs. This is a conscious choice in order to make it possible for users to customize any part of the navigation experience (because it's implemented in JavaScript) and to be able to debug issues that they encounter without needing to learn Objective C / Swift / Java / Kotlin.
- If you need the exact platform behavior you are better off using another library that wraps the platform APIs. Read more about these in [Alternatives](alternatives.md) and be sure to understand the tradeoffs that they make before digging in!
- Because much of the logic for React Navigation runs in JavaScript rather than in native, the usual concerns about blocking the JavaScript thread come into play.
---
## Alternative libraries
Source: https://reactnavigation.org/docs/1.x/alternatives
React Navigation isn't your only option for routing and navigation in React Native. If the [pitch & anti-pitch](pitch.md) or the API design leave you wanting to explore other options, here are a few to consider.
- [react-native-router-flux](https://github.com/aksonov/react-native-router-flux): this library is based on React Navigation but provides you with a different API to interact with it.
- [react-native-navigation](https://github.com/wix/react-native-navigation): uses the underlying native APIs on iOS and Android, this is a popular alternative to React Navigation and worth considering if you value adhering to the platform conventions exactly and do not care as much about customization.
---
## React Navigation contributor guide
Source: https://reactnavigation.org/docs/1.x/contributing
Want to help improve React Navigation? Your help would be greatly appreciated!
Here are some of some of the ways to contribute to the project:
- [Reporting Bugs](#reporting-bugs)
- [Improving the Documentation](#improving-the-documentation)
- [Responding to Issues](#responding-to-issues)
- [Bug Fixes](#bug-fixes)
- [Suggesting a Feature](#suggesting-a-feature)
- [Big Pull Requests](#big-pull-requests)
And here are a few helpful resources to aid in getting started:
- [Issue Template](#issue-template)
- [Pull Request Template](#pull-request-template)
- [Forking the Repository](#forking-the-repository)
- [Code Review Guidelines](#code-review-guidelines)
- [Run the Example App](#run-the-example-app)
- [Run the Website](#run-the-website)
- [Run Tests](#run-tests)
> Note that we used Yarn in the examples below but you're welcome to use NPM instead.
## Contributing
### Reporting Bugs
You can't write code without writing the occasional bug. Especially as React Navigation is in beta and moving quickly, bugs happen. When you think you've found one here's what to do:
1. Search the existing issues for one like what you're seeing. If you see one, add a 👍 reaction (please no +1 comments). Read through the comments and see if you can provide any more valuable information to the thread
2. If there are no other issues like yours then create a new one. Be sure to follow the [issue template](https://github.com/react-navigation/react-navigation/blob/1.x/.github/ISSUE_TEMPLATE.md).
Creating a high quality reproduction is critical. Without it we likely can't fix the bug and, in an ideal situation, you'll find out that it's not actually a bug of the library but simply done incorrectly in your project. Instant bug fix!
### Improving the Documentation
Any successful projects needs quality documentation and React Navigation is no different.
Read more about the documentation on the [react-navigation/website repository](https://github.com/react-navigation/website).
### Responding to Issues
Another great way to contribute to React Navigation is by responding to issues. Maybe it's answering someone's question, pointing out a small typo in their code, or helping them put together a reproduction. If you're interested in a more active role in React Navigation start with responding to issues - not only is it helpful but it demonstrates your commitment and knowledge of the code!
### Bug Fixes
Find a bug, fix it up, all day long you'll have good luck! Like it was mentioned earlier, bugs happen. If you find a bug do the following:
1. Check if a pull request already exists addressing that bug. If it does give it a review and leave your comments
2. If there isn't already a pull request then figure out the fix! If it's relatively small go ahead and fix it and submit a pull request. If it's a decent number of changes file an issue first so we can discuss it (see the [Big Pull Requests](#big-pull-requests) section)
3. If there is an issue related to that bug leave a comment on it, linking to your pull request, so others know it's been addressed.
Check out the [help wanted](https://github.com/react-navigation/react-navigation/issues?q=is%3Aissue+is%3Aopen+label%3A%22help+wanted%22) and [good first issue](https://github.com/react-navigation/react-navigation/issues?q=is%3Aissue+is%3Aopen+label%3A%22good+first+issue%22) tags to see where you can start helping out!
### Suggesting a Feature
Is there something you want to see from React Navigation? Please [create a feature request on Canny](https://react-navigation.canny.io/feature-requests).
### Big Pull Requests
For any changes that will add/remove/modify multiple files in the project (new features or bug fixes) hold off on writing code right away. There's a few reasons for that
1. Big pull requests take a lot of time to review and it's sometimes hard to pick up the context
2. Often you may not have to make as big of a change as you expect
With that in mind, here's the suggestion
1. Open an issue and clearly define what it is you want to accomplish and how you intend to accomplish it
2. Discuss that solution with the community and maintainers. Provide context, establish edge cases, and figure out the design
3. Decide on a plan of action
4. Write the code and submit the PR
5. Review the PR. This can take some time but, if you followed the steps above, hopefully it won't take too much time.
The reason we want to do this is to save everyone time. Maybe that feature already exists but isn't documented? Or maybe it doesn't fit with the library. Regardless, by discussing a major change up front you're saving your time and others time as well.
### Interface Changes & Types
If you ever find yourself making a change to the project's public interface (the API) then you should make sure to update the corresponding library definitions for Flow. These "libdefs" specify our API's types so that library users can typecheck their code. An example of a qualifying change would be adding a new navigation option.
The libdef (located at `flow/react-navigation.js`) will need to be updated such that running `flow` in the `examples/NavigationPlayground` folder produces no errors.
1. Follow the instructions in the [Run the Example App](#run-the-example-app) section to prepare the `NavigationPlayground` example and install `flow` into the example's local `node_modules/.bin` folder.
2. Run `flow` to see any current errors.
3. If no errors occur as a result of an API change, that indicates that we don't have any coverage in the `NavigationPlayground` example project for your API change. This is frequently the case - for instance, if you add a new navigation option. In this case, you must add an example use of your new feature to `NavigationPlayground` so that you can test your libdef changes, and so that we can keep your feature properly tested and typed in perpetuity.
4. Once you are seeing errors, go ahead and update the libdef (located at `flow/react-navigation.js`) so that there are no longer any errors when you run `flow` from within `examples/NavigationPlayground`.
5. Include the libdef changes in the PR for your new feature. Make sure to flag to the maintainers that your PR has a libdef change, so that when the next version of the library is released, we make sure to upload the updated libdef to the `flow-typed` repo.
## Information
### Issue Template
Before submitting and issue please take a look at the [issue template](https://github.com/react-navigation/react-navigation/blob/1.x/.github/ISSUE_TEMPLATE.md) and follow it. This is in place to help everyone better understand the issue you're having and reduce the back and forth to get the necessary information.
Yes, it takes time and effort to complete the issue template. But that's the only way to ask high quality questions that actually get responses.
Would you rather take 1 minute to create an incomplete issue report and wait months to get any sort of response? Or would you rather take 20 minutes to fill out a high quality issue report, with all the necessary elements, and get a response in days? It's also a respectful thing to do for anyone willing to take the time to review your issue.
### Pull Request Template
Much like the issue template, the [pull request template](https://github.com/react-navigation/react-navigation/blob/1.x/.github/PULL_REQUEST_TEMPLATE.md) lays out instructions to ensure your pull request gets reviewed in a timely manner and reduces the back and forth. Make sure to look it over before you start writing any code.
### Forking the Repository
- Fork [`react-navigation`](https://github.com/react-community/react-navigation) on GitHub
- Run these commands in the terminal to download locally and install it:
```bash
git clone https://github.com//react-navigation.git
cd react-navigation
git remote add upstream https://github.com/react-community/react-navigation.git
yarn install
```
### Code Review Guidelines
Look around. Match the style of the reset of the codebase. This project uses ESLint to ensure consistency throughout the project. You can check your project by running
```bash
yarn run eslint
```
If any errors occur you'll either have to manually fix them or you can attempt to automatically fix them by running `yarn run format`.
### Run the Example App
```bash
yarn install
cd examples/NavigationPlayground
yarn install
yarn start
```
You will be show a QR code to scan in the Expo app. You can get Expo [here](https://docs.expo.io/versions/latest/index.html) if you don't have it yet.
All examples:
- [NavigationPlayground](https://github.com/react-navigation/react-navigation/tree/1.x/examples/NavigationPlayground)
- [ReduxExample](https://github.com/react-navigation/react-navigation/tree/1.x/examples/ReduxExample)
- [SafeAreaExample](https://github.com/react-navigation/react-navigation/tree/1.x/examples/SafeAreaExample)
Commands are the same as above for any of the example apps. If you run into any issues, please try the following to start fresh:
```bash
watchman watch-del-all
yarn start -- --reset-cache
```
### Run the Website
For development mode and live-reloading:
```bash
cd website
yarn install
yarn start
```
To run the website in production mode with server rendering:
```bash
yarn run prod
```
If you've made any changes to the `docs` directory you'll need to run `yarn run build-docs` from the root of the project before they're picked up by the website.
### Run Tests
React Navigation has tests implemented in [Jest](https://facebook.github.io/jest/). To run either of these, from the React Navigation directory, run either of the following commands (after installing the `node_modules`) to run tests or type-checking.
```bash
yarn run jest
```
These commands will be run by our CI and are required to pass before any contributions are merged.
---